Importance of Piston Rod on a Graco Paint Sprayer

Posted 4 months ago

Importance of Piston Rod on a Graco Paint Sprayer

The Piston Rod is a crucial component of Graco pumps. It connects to the motor via a connecting rod and moves up and down with the action of the motor, transferring the motor’s power and motion to the pump by moving the internal components of the pump. The Piston Rod is responsible for displacing fluid out of the pump during both the upstroke and downstroke. In the upstroke, it creates a vacuum or suction that draws in the fluid or paint from the suction hose and the same time it is displacing fluid out of the pump. The down stroke serves as opportunity to allow already drawn in paint to get to the fluid displacement chamber. This results in continuous flow of paint or liquid being pumped.

Do Graco Piston or Displacement Rods Wear?

Piston Rod also called Displacement Rod is so vital in Graco Pump that there will be no Graco Piston Pump without the Piston Rod. Piston Pods wear out as they get used. It is very important to make sure your Piston Rod is not worn, as a worn Piston or Displacement Rod will result in non-working or inefficient pump and resulting in a non-working paint sprayer. While inspecting your Piston also check your Piston Valve, Repacking kits, Intake and Outlet Balls, Carbides, and Cylinder for wear. Together they make a good functional pump.

How can you tell a worn Graco Piston Rod?

A good Piston Rod should be smooth and have no deep grooved marks. It should not be abrasive or rough. Most Piston Rods should be Chromex plated, and the plating should not be broken or chipped. The internal threads should be in good thread able state and not cross threaded.  There should be no trash or residue insides the piston rod as it could get the outlet ball stuck resulting in Pump failure.

Repacking Titan 805-236A Fluid section assembly for Titan 840 and 740
Posted 4 months ago

Repacking Titan 805-236A Fluid section assembly for Titan 840 and 740


Begin by removing the foot valve assembly and the lower housing.  By following these procedures:

  1. Loosen and remove the foot valve housing from the lower housing.
  2. Clean out any debris in the foot valve housing and examine the housing and the foot valve seat. If the seat is damaged, reverse or replace the seat.
  3. Using two wrenches, hold the upper housing at the wrench flats with one wrench and loosen the lower housing with the other. Remove the lower housing.
  4. Using a 3/8” wrench, loosen and remove the outlet valve retainer from the piston rod.
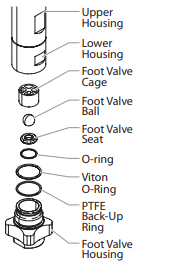
Please note that the outlet valve does not require disassembly from the piston rod during this procedure.

Rotate the fluid section counterclockwise to detach it from the gearbox housing.

Secure the upper housing upright in a vise, taking care not to over-tighten to prevent damage.

Utilizing a wrench, remove the upper seal retainer.

Slide the piston rod forward until the piston is out of the T-slot on the slider assembly.

Extract the Titan 805-437A Piston rod through the bottom of the upper housing.

Inspect the piston rod for wear and replace if necessary.

Remove the upper and lower packings from the upper housing, being careful not to damage the upper housing during the process.

Reassembly of the Parts

Clean the upper housing and inspect it for damage, replacing if needed.

Unwrap the upper packing and preform tool, using scissors to cut the plastic wrap (avoid using a utility knife to prevent damage to O-rings).

Slide the upper packing off the sizing/insertion tool towards the tip and install it into the top of the upper housing with the raised lip on the packing facing down.

Insert the spacer on top of the upper packing.

Thread the upper seal retainer into the upper housing and torque it to 25-30 ft. lbs.

Pre-form the lower packing using the lower packing sizing tool included in the repacking kit.

Install the lower packing with the side containing the O-ring closest to the face of the packing facing up.

Partially insert the lower packing into the bottom of the upper housing so that the O-ring side faces up.

Use the lower packing insertion tool to push the lower packing into position.

Place the piston insertion tool over the top of the piston rod.

Insert the piston rod into the bottom of the upper housing, through the lower packing, upper packing, and out through the upper seal retainer.

Ensure the raised lip on the bottom of the lower packing is fully outside the packing around the piston rod after insertion.

Remove the piston insertion tool from the top of the piston rod.

Slide the top of the piston rod into the T-slot on the slider assembly.

Turn the knock-off nut counterclockwise until it is flush against the upper housing.

Lubricate the threads on the upper housing with anti-seize compound, remove the upper housing from the vise, and thread it into the gearbox housing clockwise.

Continue turning the upper housing clockwise until the knock-off nut is flush against the gearbox housing.

If the nipple on the upper housing does not face the back of the unit, turn the upper housing counterclockwise until it does, avoiding more than one full turn.

Once the nipple is in position, turn the knock-off nut clockwise until it contacts the gearbox housing.

Tap the knock-off nut with a soft hammer to tighten it against the gearbox housing.

Ensure the Viton O-ring and PTFE back-up ring are lubricated and in place, then thread the lower housing into the upper housing. Use two wrenches to hold the upper housing at the wrench flats and tighten the lower housing.

Attach the high-pressure hose to the nipple on the back of the housing and tighten it with a wrench, avoiding kinking the hose.

For low rider units, ensure the hose does not touch the cart frame. If it does, reposition the nipple by turning the upper housing until the hose is clear of the frame, and the nipple is within 45º of the back of the unit.

Ensure the Viton O-ring and PTFE back-up ring are lubricated and in place, reassemble the foot valve assembly, and thread it into the lower housing securely.

Thread the siphon tube/siphon set into the foot valve and tighten it securely. Remember to wrap the threads on the down tube/siphon tube adapter with PTFE tape before assembly.

Replace the return hose into the clamp on the siphon tube.

Place the front cover on the gearbox housing and secure it in position using the four front cover screws.

Turn on the sprayer by following the procedure in the appropriate procedure and check for leaks.

Please note that a repacking kit with part number Titan 805-1010 Pump Repair Kit is available for this process.


How to Identify and Replace Faulty Binks 6-188 Components

Posted 8 months ago
Binks 6-188

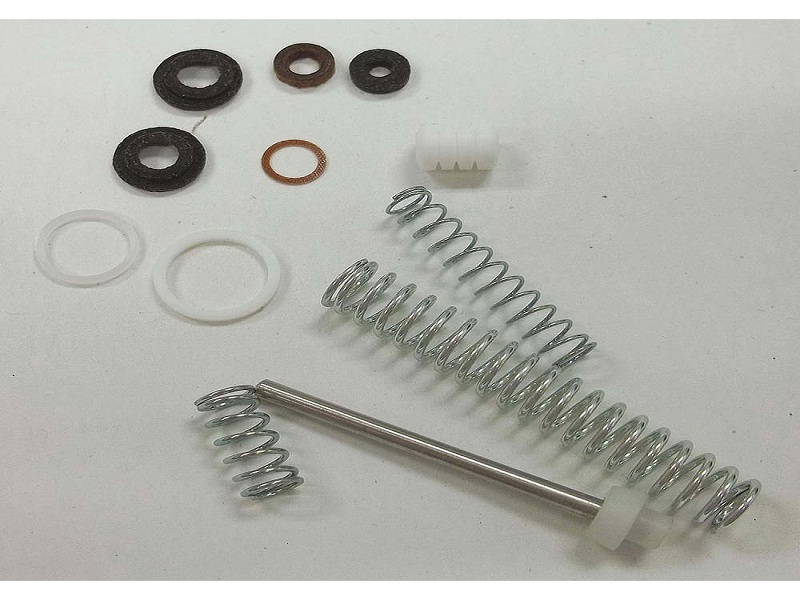
In the realm of spray painting, consistent spraying machines and their performance is paramount. Over time, even the most premium products undergo wear and tear processes and require your timely attention to provide superior performance. Binks 6-188 is a comprehensive solution to revive your spraying machines and equipment. It brings back the superior performance of your painting machines. A binks repair kit is designed to address the needs of equipment put to rigours of daily use.

Binks 6-188 repair kit provides the users with all the essential components to restore their painting equipment to their optimal condition. This guide illuminates the nuances of pinpointing signs of wear and tear in the equipment, as well as the correct utilization of the Binks 6-188 repair kit.

Recognizing the Telltale Signs of Wear and Tear

Inconsistent Spray Patterns

Inconsistent and rough spray patterns can be the first sign of ruling signs of wear and tear in your painting equipment. Spotty and uneven spraying patterns are indicative of the wearing-out of nozzles. Furthermore, the inconsistency in the spraying pattern can also indicate compromised seals.

Air Leaks

Unusual hissing sounds produced by the equipment or diminished pressure is a clear indication of faulty connections in the equipment. It also hints weakening of hoses and warns you of hose replacement.

Operational Logs

Premium spray guns are designed to produce superior-quality performance only. If your spray machine is lagging in performance, it’s an indication of internal component degradation. The condition of the internal components of the spraying equipment grapples with the overall efficiency of the machine.

The Anatomy of the Binks 6-188 Kit

To carefully replace the faulty components of your whooping expensive painting equipment, it’s prudent to acquaint oneself with the anatomy of the repair kits. It gives you a quick understating of the components given in the kit, their functioning, and how to replace your worn-out parts with the components in the kit.

Nozzles and Associated Components

Nozzles and seals are vital to achieve consistency in the spraying pattern. Once you inspect a nozzle and identify wear and tear, you replace your nozzles with the ones from the kit.

Seals and O-rings

Leakages can be controlled if you frequently inspect your O-rings and seals and carefully replace them from the Binks 6-188 spray gun repair kit.

Diverse Parts

Apart from the crucial components like nozzles and seals, repair kits have diverse parts tailored specifically for rectifying different wear and tear issues.

Mastery of using the Binks 6-188 repair kits

Step-by-step Disassembly

Disassembly of the parts can be overwhelming. Photographs and labeling can help you in identifying different parts. You can disassemble your spray gun and your painting equipment methodically with the labeling aids.

Spotting the Culprits

Take out the worn-out culprits and separate them from the other components of your spray gun. Now compare them with the pristine pieces from the Binks 6-188 kits. The contrast ensures the correct replacement of the components.

Installation of New Components

Aged parts are prone to wear and tear. This wear and tear can occur anytime, even in the middle of your project. Diligent replacement of the aged parts prevents that from happening. Make sure to double-check to ascertain the security of the fittings.

Reassemble Equipment and Dry Run

Post-replacement carefully reassemble your pain spraying machine to compose the spray gun. a dry run is for testing the equipment without painting materials to ascertain the seamless operation of the gun.

Prolonging the Life of Your Equipment

Routine Cleaning

Post-operation cleaning of your equipment is an essential part of prolonging the longevity of your machine. It wards –off clogging and protects the machine from wearing out.

Frequent Inspections

Regular inspection of your equipment for signs of wear and tear can prevent the damage from progressing.

Advocating Genuine Parts

When replacing the components of your spraying machines, compatibility is paramount. Using authentic repair kits like Binks 6-188 ensures the efficacy and longevity of your product without compromising its quality.

The Bigger Picture – Why Maintenance Matters!

Proper maintenance and cleaning of your equipment is not just for extending its lifespan. Proper maintenance routine reduces long-term costs, mitigating the need for frequent replacements. You are not only saving your money otherwise spent on replacements and repairs but contributing to the sustainability of your work.


Regular maintenance by using genuine repair kits like Binks 6-188 for replacements reduces the cost of major repairs.

Conclusion

Binks 6-188 testifies to the adage, “Prevention is better than Cure!”By identifying early signs of wear and tear, you ensure that your equipment is always in peak condition. On ruling out signs of wear and tear, users can take provocative measures to protect their equipment from extensive damage.

Investing in genuine repair kits for your spray guns is a step towards the impeccable quality of your spraying machine and sustainable practices. Understanding when and how to use your repair kits not only allows you to protect your machine from extensive damage but allow you to add to its proficiency.

Upgrading Binks Paint Sprayer Parts for Optimal Efficiency

Posted 8 months ago
Binks paint sprayer parts

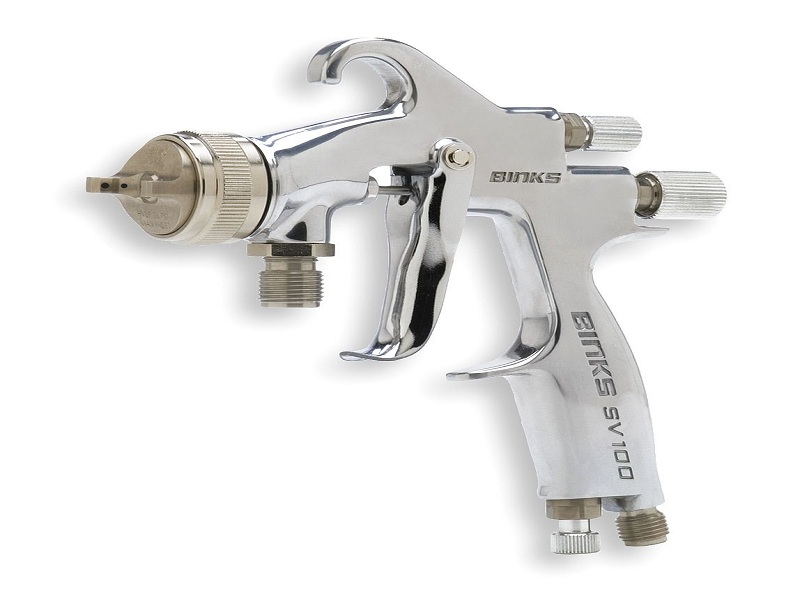
In the world of commercial and industrial painting, the precision of results and efficiency are two paramount factors. Optimal results in the shortest possible time are the key concern of professional painters and contractors in the industry. When the industry is flooded with ways, up gradation of your Binks paint sprayer parts is one of the easiest ways to achieve the desired results. Binks is a trusted and renowned name in the painting industry. From offering high-quality products to giving quality upgrades to these parts, Binks can elevate your painting experience.

Binks has a proud reputation when it comes to quality and performance. However, as with all the equipment, there is always room for upgradation. And by optimizing several parts of the sprayer, you can boost the performance of your paint sprayer.

This blog will explore the importance of optimization of your paint sprayers with genuine parts to upgrade their efficiency and superior performance.

Why Upgrade your Binks Sprayer Parts

Binks sprayer parts are standard in many circles of professional painting. But wear and tear can take a toll on all the machines. Upgraded machines can often surpass the performance of their original parts. Therefore, upgrading the parts of your paint sprayers is a great way to achieve optimal efficiency.

Here’s why you should consider upgrading parts of your paint sprayers,

Enhanced Performance

Take this as updating the ‘software’ of your computer or mobile. The operation becomes smooth. The same goes for upgrading the parts of your sprayers, you can unlock smooth operation. Moreover, faceless clogging, and enjoy consistent and uniform spraying patterns.

Increased Longevity

While many paint sprayers are built to last, Binks paint sprayer parts can enhance the performance, as well as, extend the longevity of the machine.

Increased Efficiency

Efficiency is the cornerstone of any professional painting project. Upgrading parts like the air compressor and the fluid delivery system can bring drastic changes to the efficiency of your projects.

Time-Saving

Time is money, and contractors and professional painters live by it. In industrial painting projects, where large-scale painting is a norm, even the slightest increase in efficiency can translate into significant time-saving.

Versatility

Commercial and industrial painting projects are not limited to just any specification. Different projects have different areas of work and specs. Upgrading your part sprayers to premium parts, allow you to adapt to the requirements of different project.

Whether working with different projects, or with different viscosities of paint, having flexible parts that allow you to switch out definitely streamlines your experience.

Cost Efficiency

By upgrading the parts of your paint sprayers, you can eliminate the need for frequent repairs and replacements. New parts also reduce the need for repeated maintenance of your sprayers.

Key Parts to Consider Upgrading with Binks Sprayer Parts

Nozzles and Tips

Nozzles and tips have a direct influence on the spraying pattern and the final finish of your paint sprayer. Upgrading to precision-engineered nozzles, you can achieve consistent coverage, and reduce overspray. Reduced overspray saves you from extra material costs.

Hoses

The quality of the hose has a direct impact on how smoothly the paint flows from the container to the nozzle of your sprayer gun. When upgraded every now and then, they resist kinking and show resistance to wear and tear and premature damage to your sprayer.

Filters

Filters participate in the consistent application of paint by preventing unwanted particles to taint the paint. Optimization of the filters with Binks parts can reduce clogging while giving optimal efficiency.

O-rings and Seals

Seals and O-rings are small parts of your sprayers but are equally essential in maintaining a smooth painting journey. They make sure that your paint sprayers remain leakage free. Upgrading your seals and O-rings with premium materials can offer optimal resistance to paint and solvent materials.

Tips for Optimization Process

Know your Model

Always ensure that the Binks parts you are purchasing show optimal compatibility with your specific model of paint sprayer.

Professional Installation

While most of the upgrades can be DIY, you can always seek professional help for the installation of the parts. Paint sprayers are hefty investments; you cannot try out things on them. If you’ve not got it under control, it’s better to seek professional help.

Prioritize

When on budget, identify which upgrades are the need of the hour. The upgrades that deliver the most immediate results can always be your priority, as they’ll directly enhance your performance.

Conclusion

Upgrading your Binks sprayer parts can be your strategic move to yield optimal efficiency as well as substantial benefits for your painting operations. Enhanced performance, versatility, increased efficiency, time-saving, and cost savings are the few benefits that upgrading offers. By focusing on key components of your sprayers like nozzles, hoses, seals and O-rings, and filters, you can uplift the efficiency of your painting projects. Embrace the culture of continuous improvement and efficiency, starting with the very tools that represent the backbone of your painting projects.